本文主要记录本人学习ansible中的一些知识点,对ansible的一些模块进行一些简单的介绍。
安装
1 | yum -y install epel-release |
Ansible基础
Ansible架构图

Ansible核心组件说明
- Ansible:Ansible的核心程序
- Host Lnventory:记录了每一个由Ansible管理的主机信息,信息包括ssh端口,root帐号密码,ip地址等等。可以通过file来加载,可以通过CMDB加载
- Playbooks:YAML格式文件,多个任务定义在一个文件中,使用时可以统一调用,
剧本用来定义那些主机需要调用那些模块来完成的功能 - Core Modules:Ansible执行任何管理任务都不是由Ansible自己完成,而是由核心模块完成;Ansible管理主机之前,先调用
core Modules中的模块,然后指明管理Host Lnventory中的主机,就可以完成管理主机。 - Custom Modules:自定义模块,完成Ansible核心模块无法完成的功能,此模块支持任何语言编写。
- Connection Plugins:连接插件,Ansible和Host通信使用
Ansible执行过程
暖色调的代表已经模块化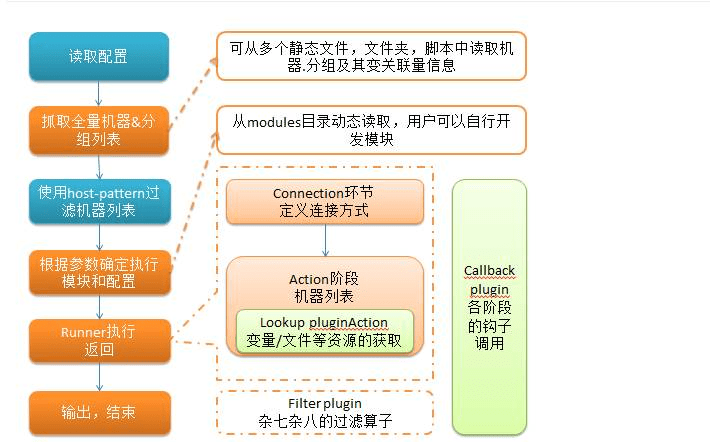
清单文件
1 | [servers] |
默认清单文件是/etc/ansible/hosts。
同时也可以在运行时通过-i参数来指定清单文件。
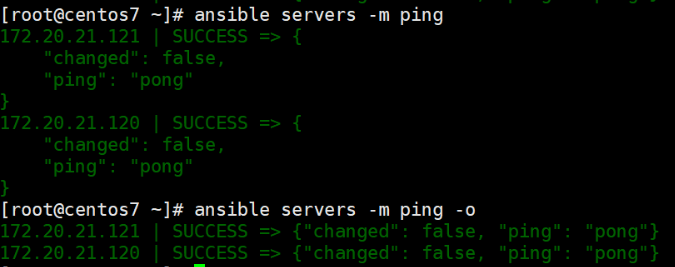
测试主机连通性
1 | ansible www.baidu.com -m ping |
发现执行结果异常,这是因为ansible只纳管定义在清单文件中的主机。

1 | ansible servers -m ping |
通过-o参数,可以让结果在一行中进行显示。
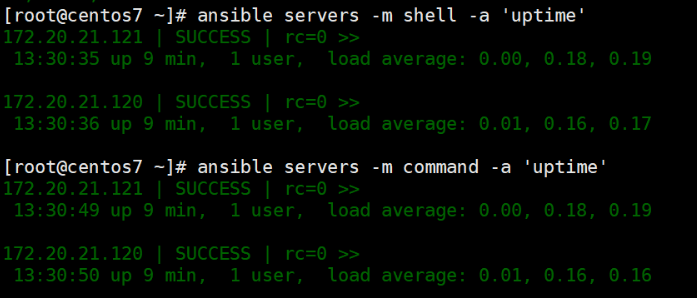
执行远程指令
1 | ansible servers -m shell -a 'uptime' |
远程主机的yum管理
确认软件是否安装
1 | [root@centos7 ~]# ansible servers -m shell -a 'rpm -qa|grep httpd' |
安装httpd
1 | [root@centos7 ~]# ansible servers -m yum -a 'name=httpd state=latest' |
再次安装
再次安装时,就会检查客户端已安装的组件是否是最新的,若是最新的就不会再次安装。changed字段会返回false。1
2
3
4
5
6
7
8
9
10[root@centos7 ~]# ansible servers -m yum -a 'name=httpd state=latest'
172.20.21.121 | SUCCESS => {
"changed": false,
"msg": "",
"rc": 0,
"results": [
"All packages providing httpd are up to date",
""
]
}
Ansible组件 - Inventory
Inventory主机清单
inventory文件通常用于定义要管理主机的认证信息,例如ssh登录所需的用户名、密码以及key相关信息。/etc/ansible/hosts文件配置:1
2
3
4
5
6
7
8
9
10
11
12
13
14
15
16[apache]
172.20.21.121
172.20.21.123
[nginx]
172.20.21.[120:121]
# 把一个组作为另一个组的子成员
[servers:children]
apache
nginx
# 定义组变量
[servers:vars]
ansible_ssh_user='root'
ansible_ssh_pass='123456'
1 | [root@centos7 ~]# ansible apache --list-hosts |
Ansible Inventory 内置参数
| 参数 | 用途 | 例子 |
|---|---|---|
| ansible_ssh_host | 将要连接的远程主机名ssh地址 | ansible_ssh_host=192.168.1.100 |
| ansible_ssh_port | ssh端口 | ansible_ssh_port=3000 |
| ansible_ssh_user | ssh 用户名 | ansible_ssh_user=user |
| ansible_ssh_pass | ssh 密码 | ansible_ssh_pass=pass |
| ansible_sudo | sudo 用户 | |
| ansible_sudo_pass | sudo 密码 | |
| ansible_sudo_exe | sudo 执行路径 | ansible_sudo_exe=/usr/bin/sudo |
| ansible_connection | hosts 连接方式 | ansible_connection=local |
| ansible_ssh_private_key_file | hosts 私钥 | ansible_ssh_private_key_file=/root/key |
Ansible组件 - Ad-Hoc
ad hoc,临时的,在ansible中是指需要快速执行,并且不需要报错的命令。对于复杂的命令则需要playbook。
执行命令 -m shell
1 | [root@centos7 ~]# ansible servers -m shell -a 'hostname' -o |
复制文件 -m copy
1 | ansible all -m copy -a "src=test.sh dest=/tmp" |

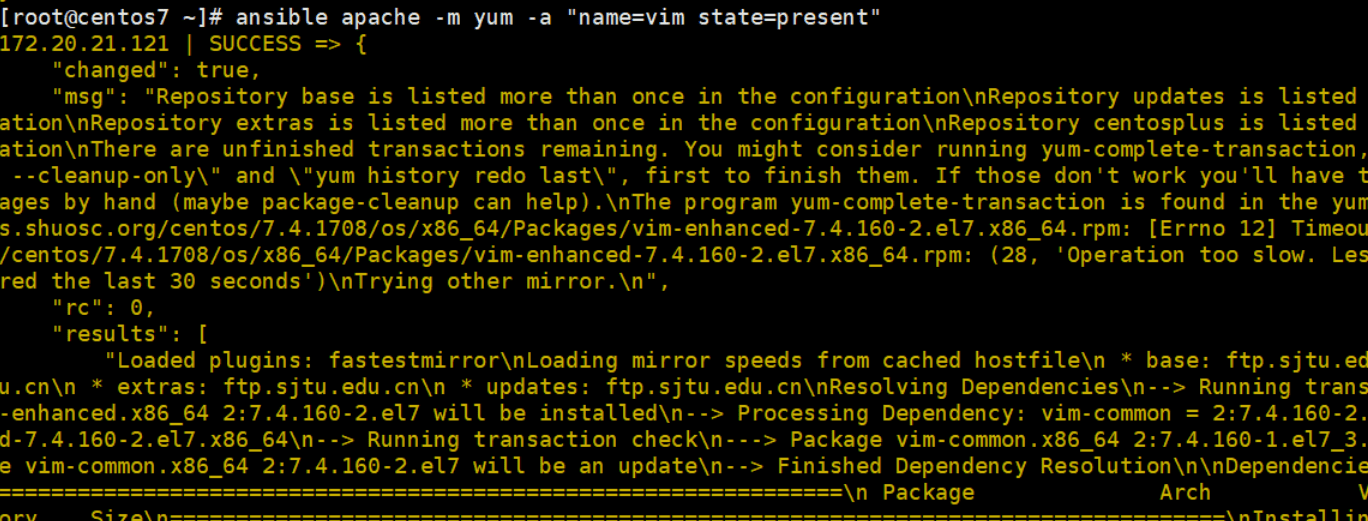
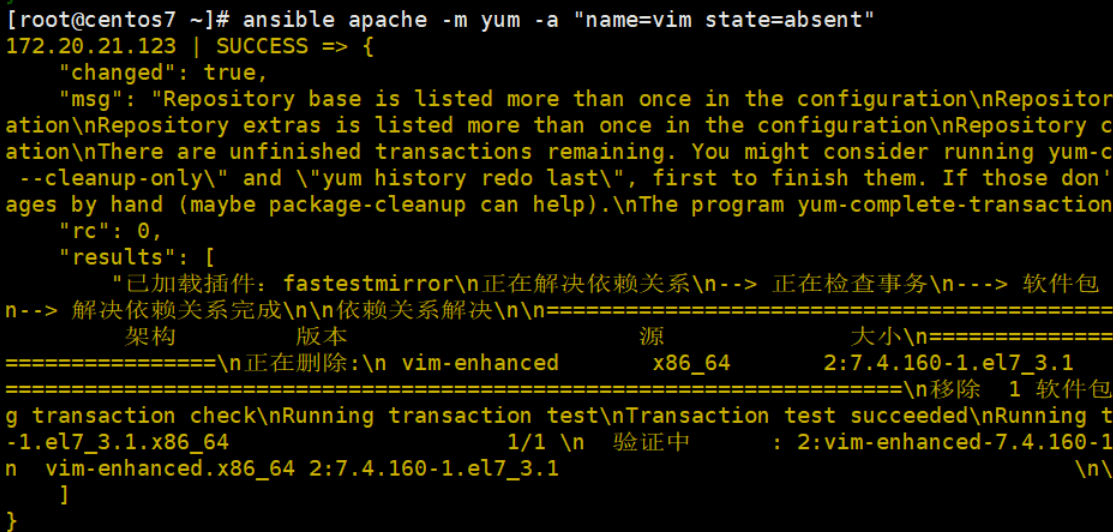
软件包管理 -m yum
1 | ansible apache -m yum -a "name=vim state=present" |
1 | ansible apache -m yum -a 'name=httpd state=absent' |
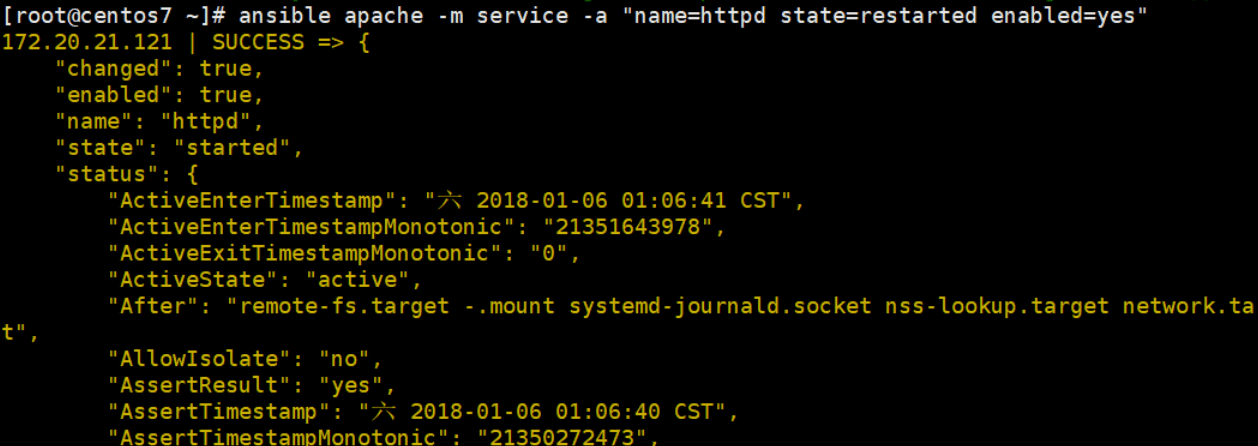
服务管理 -m service
1 | ansible apache -m service -a "name=httpd state=restarted enabled=yes" |
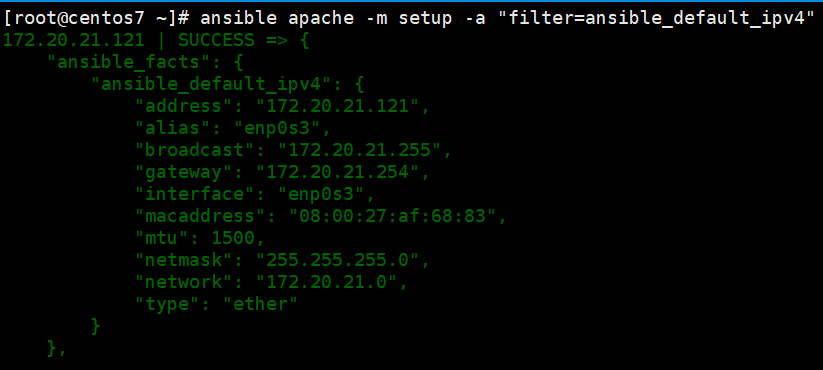
Ansible组件 - Facts
facts组件是Ansible用于采集被管理主机信息的功能,可以使用setup模块查看主机所有的facts信息。可以使用filter参数对结果进行过滤。1
2ansible apache -m setup
ansible apache -m setup -a "filter=ansible_default_ipv4"
Ansible组件 - playbook
playbook是有一个或者多个play组成的列表。play的主要功能在于将实现归并为一组的主机装扮成实现通过ansible中的task定义好的角色role。
根本上来讲,所谓的task无非是调用ansible的一个module。将多个play组织在一个playbook中,即可以让他们联合起来按事先编排的机制完成某一任务。
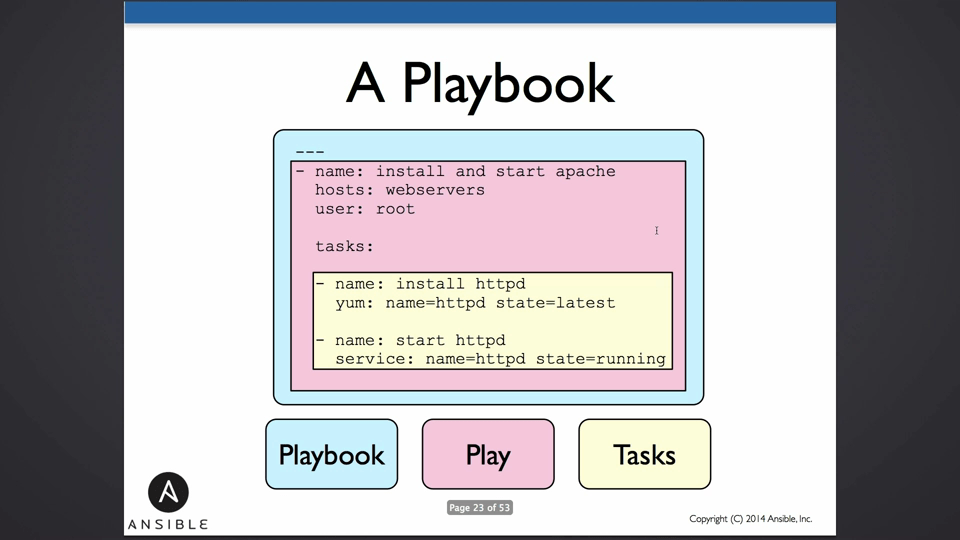
playbook示例
yaml剧本
1 | - hosts: apache |
检查
1 | ansible-playbook apapche.yaml --syntax-check |
执行playbook
1 | ansible-playbook apapche.yaml |